Installing DNN is an important step in the process to getting a DotNetNuke development environment configured. You can follow the tutorial below for How To Install DNN, you can even use this for a production installation if necessary.
Setting up your development environment can vary based on what your end goal is. If you are doing module development for your own use and within your own DNN environments, you can ignore a few of the settings below. If you are doing module development with the idea that you might turn around and give the modules away, or sell them, then you will likely want to follow the guidelines set forth below to support the widest array of DNN installation environments for customers that use your extensions.
I recommend that each developer have their own local development environment, with a local IIS website running DNN (DotNetNUke), and a SQL Server database for the website, typically also running locally. Having an individual development environment makes group module development far easier than if you share environments/databases.
For the past few years I have used a Virtual Machine environment for my DNN development. I setup a new VM per customer that I utilize, that allows me to segment the work and ensures that I don't contaminate one environment with information from another customer. For a while I used Virtual Box, but as of late I have switched to Hyper-V as that environment.
Choosing a DNN (DotNetNuke) Version
Choosing a version of DotNetNuke (DNN) is important when you start your development for couple of reasons. For modules that you are developing for yourself, you need to ask, what is the minimum version of DotNetNuke that you have in production. Are you running DNN 5.6.1? Are you running 6.2.6, 7.0.0, 7.0.6? Based on the answer you can determine what version of DNN you should setup as your development environment. You shouldn't be developing on a newer version of DNN than what you have running in production. As with everything there are ways around this, but I am not going to go into the details on that in this tutorial.
As a developer working to create modules and release those, you might have production sites that are running on the latest and greatest version of DNN, but what about your customers? Or your potential customers? You have to ask yourself, do you want to provide support for really old versions of DotNetNuke? From a development perspective you will probably say no, but from a business perspective, you might say yes, and here's why. Not everyone upgrades DotNetNuke websites as they should, and often times you will find that some people never upgrade. While I don't advise taking that approach to managing a DNN website, it is a fact of life that people don’t always upgrade and there are thousands of people, if not tens of thousands, that have sites that aren’t running on the latest version of DNN. You should take that into account when you are doing your module development, if you compile your module against an older version of DNN then your module should run on newer versions of as well, for example. If you compile your module against DotNetNuke 6.2.6 it will likely run on every version of DNN released since then. Though there are extended cases where this won’t always work, DNN strives to maintain backwards compatibility, this isn't always possible.
You might also want to use features that are only available starting with a specific version of DotNetNuke, such as the workflow functionality found starting in DNN 5.1, in that case you may choose not to support older versions of the platform out of necessity. This will minimize the market in which you can sell your modules, but also can make for less support and an easier development cycle due to the features that DNN provides.
I highly recommend that you install the latest release of DNN, for security, maintenance, and features, you should upgrade your DNN website frequently.
Chris' advice as of February 2021: You really should be running DNN 9.8 or greater at this point, and remove all Telerik dependancies. There are too many security vulnerabilities with earlier versions of DNN. You should also be encouraging your customers to upgrade to the latest versions of DNN as well.
Choosing a Package
Now here’s one that may baffle you a bit. I’m going to recommend that you use the INSTALL package for whatever version of DotNetNuke that you download. What? The INSTALL package? What about the SOURCE package? Well you can use the source, but you don’t need it. The module development that I’m setting you up for doesn't require the DNN source, and using the INSTALL package makes your development environment cleaner. We aren't going to be opening the DotNetNuke project when we do our module development, so why have the files sitting around for nothing? Also, if you've ever tried to use the SOURCE package for anything, you'll know it isn't easy.
The steps for setting up your development environment will apply to both the Community and Professional/Evoq editions of DotNetNuke (DNN)
Chris' advice as of February 2021: You should have ditched the professional (evoq) editions of DNN long ago, DNN Corp is no longer a real company adding features to their paid version of the platform. My opinion is that they are simply in it for subscription revenue and you will see no additional features of value from them ever again.
Installation Configuration
Once you have the version and package selection out of the way you can go through the installation process. While I’m not going to walk you through the minutest of details of each step of installing DotNetNuke in this post, I will at least try to point you in the right direction for each step.
Download the INSTALL package of the version of DotNetNuke you want to use in your development (or production) environment.
Extract the files in the INSTALL package to a location of your choosing, this location is where you will point IIS (the web server) when we can configure the website. In my environment I typically use c:\websites\dnndev.me\ (One item of note: you may need to right click on the ZIP file and choose Properties before extracting, on the properties window if you have an UNBLOCK option, click that. Some versions of Windows block files within the DNN ZIP files, which will cause you problems later during the actual install.)
Setup IIS (Internet Information Services)
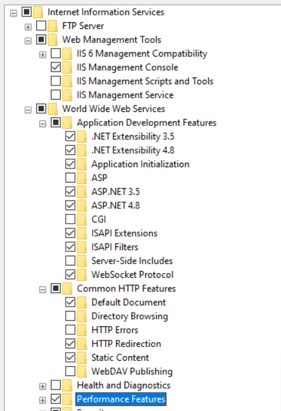
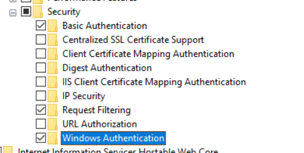
IIS is the web server that comes with Windows computers. You will need to make sure to install IIS via the Windows "Turn Windows Features On or Off" from the Windows Control Panel. There are a variety of items you need to check to enable IIS to function properly for DNN. See the images provided here for details on which items we recommend selecting.
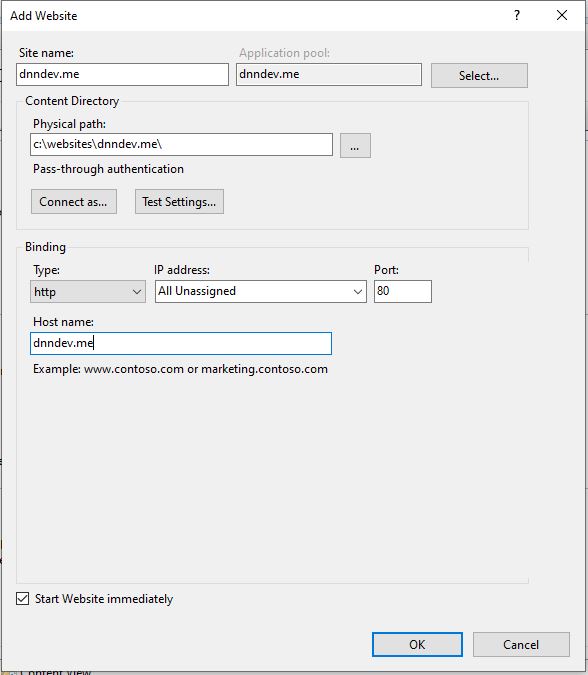
In IIS you should create a new website (Note: If you use an existing website in IIS be sure to add the HOST binding for DNNDEV.ME), and point to the folder where you extracted the INSTALL package. See my sample screenshot for my recommended configuration of that website in IIS.
Set File Permissions
Setting up the file permissions for your DNN install is often the step that causes the most trouble. You should right click on the FOLDER in which you extracted DNN (c:\websites\dnndev.me\) and choose properties. Choose the Security tab. You need to add permissions for the account in which your website's application pool is running under. You will want to setup the permissions to give the account Full or Modify permissions for the DNNDEV.ME folder. Which account you will use will vary based on your version of IIS, here’s a simple list of some of the default accounts based on the version of IIS.
IIS Version Operating System Account
IIS 7 Windows Vista, Windows Server 2008 localmachine\Network Service
IIS 7.5 Windows 2008 R2, Windows 7 IIS AppPool\APPPOOLNAME (IIS AppPool\DNNDEV.ME)
IIS 8 Windows 2012, Windows 8/10 IIS AppPool\APPPOOLNAME (IIS AppPool\DNNDEV.ME)
Note: If you are using IIS7.5/8.0 you’ll notice in the above table that we have APPPOOLNAME in the identity, this is because when you setup a new website in IIS a new application pool is created. In place of you should type in the name of the application pool that was created. You can also bypass this and configure your application pool to use the Network Service account instead of a dynamic account if you would like. (IIS AppPool\DNNDEV.ME)
Database Configuration
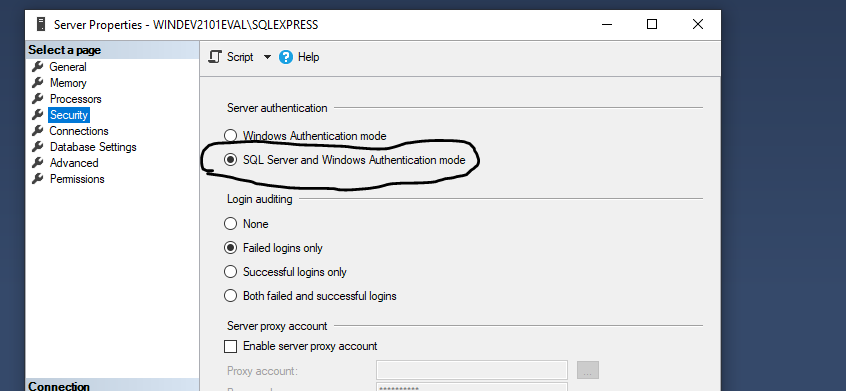
DNN requires a database to run. Out of the box, you can install SQL Express and DNN will attempt to use that in a file system based approach. That can work, but I prefer a more hands on approach to my database, I create a database, and user account to access that database. Be sure that when you install SQL Server (or after) that you enable SQL Server Authentication, by default it will only use Windows Authentication and that can make things difficult to configure.
If you didn't configure SQL Authentication during install, connect to your SQL instance using SSMS (SQL Server Management Studio), right click on the server and choose Properties. Under the Security section (page on the left) choose SQL Server and Windows Authentication mode as in the screenshot.
In SQL Server you should go through and create a new database. I always create a database with the same name as the website, so in this case DNNDEV.ME. Once you have created the database, create a user that can access that database. I always use SQL authentication, turn off the enforce password requirements, and give the user DB Owner and Public access to the DNNDEV.ME database. Remember the username and password you create here as you will need them when you walk through the Installation screen for DotNetNuke.
DotNetNuke Installation Screen
Populate the installation screen with the standard DNN information, Host username, password, etc. For the Database option, choose Custom and configure your database connection, providing the Server IP/Name, the Database name (dnndev.me). For the database authentication you'll want to choose the option that allows you to enter the username/password for the database user that you created previously.
Now there are two additional options you can configure, normally I would tell you not to modify these, but from a development environment perspective I do recommend that you change the objectQualifier setting (As of February 2021, I couldn't tell you the last time I used this setting, you can change these if you want, but it is likely you'll never need to). It should be blank by default, you should type in “dnn” (without quotes), this will prepend “dnn_” to all of the objects that get created by DNN such as Tables and Stored Procedures. This is not something I recommend from a production stand point, but if you are developing modules for sale, then supporting objectQualifier in your development is recommended. It will save you time down the road if you have a customer who has an objectQualifier defined on their production databases.
DotNetNuke Module Development
To get started with your DNN module development, be sure to read our tutorial on how to install our Module Development Templates.
Last updated: 2/26/2021
This tutorial is based on original instructions provided by Chris Hammond in an old blog post, which became the DotNetNuke Wiki entry for Module Development Environment Configuration.